Setting up an eCommerce store is an essential aspect for any business to compete in today’s digital world. It not only allows you to accept payments from your customers online but also increases the global presence of your company. There are several ways to set up your online store and certain steps that need to be followed to do it perfectly. One of the best ways to set up your online store is to use WooCommerce and its many options. It allows you to set up every aspect of your business such as creating products, setting up payments and payment gateway, and setting up the various shipping options.
The main part of any online business is setting up payments which you will receive from your customers after they have made a purchase. These payments are usually done by using payment gateways as they offer customers a safe, quick, and easy-to-use payment system. Choosing and setting up a payment gateway system is not as easy as flipping a switch, however, some of the following insights might make it helpful for you to make an informed decision.
What is a payment gateway?
A payment gateway is a service that allows an online store to receive payments securely from its customers. Certain security protocols and encryptions are followed to keep sensitive transaction data safe. From verifying the customer billing address and authenticating funds to getting the funds into your account, it is all handled by the payment gateway.
A payment gateway can execute several transaction types such as authorization, capture, sale, and refund. Authorization is a type of transaction where the system checks the funds in a customer account. It does not process the actual payment but ensures that the customer is capable of making the purchase. Capture transaction type is where a previously authorized transaction is processed and the funds are sent to the merchants’ account. A sale is a combination of authorization and capture transaction types, most likely for immediate purchases. A refund transaction type is used for a canceled order where the merchant will have to apply for a refund in the payment gateway dashboard.
Payment Processing Flow
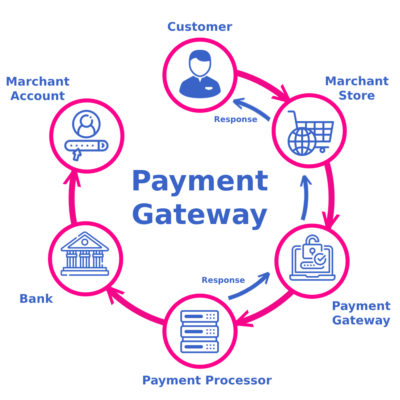
The payment processing flow is a complicated process involving several financial institutions, and tools, that verify the transaction data on both ends, and at the same time allow the customer to complete the transaction in a few seconds. The following steps are involved in the payment processing flow.
- A customer purchases an item and fills in the required data for the transaction to begin. This data is then encrypted and sent to the merchants’ web server via an SSL connection.
- This data is then passed to the payment gateway via another encrypted SSL channel. Payment gateways send this data to payment processors which then pass the transaction to the appropriate card network.
- The card networks verify the transaction data and pass it to the issuer bank (the bank that produced the cardholder’s credit/debit card).
- The issuer bank then accepts or denies the authorization request and sends a code back to the payment processor, which contains the transaction status or error details.
- This transaction status is returned to the payment gateway, then passed to the website. This status is then passed on to the customer via a payment system interface such as webhooks.
- The funds are transferred to the merchant’s account within a couple of days. This transaction is usually performed between the issuing bank to the acquiring bank.
Different types of payment gateways
- Hosted payment gateway: A hosted payment gateway is usually facilitated by third-party service providers and requires your customers to leave your website to complete the transaction. This redirected URL allows a customer to securely input their sensitive card information. Once the transaction is complete the customer is then redirected back to the merchant website where the status of the transaction is shown.
- Direct post gateway: A direct post gateway integration allows your customers to shop without leaving your website and at the same time allows you to operate without getting PCI compliance. A vendor sets up an API connection between your shopping cart and its payment gateway to post the card data which allows the data to get the gateway instantly without being stored on your website.
- Non-hosted or integrated gateway: A non-hosted gateway means that no third parties are involved at the checkout stage and the entire transaction data is processed and stored on the merchant’s server. This is usually done by designing or installing a payment gateway solution on the merchant’s website. This means that the merchant is in charge of storing, securing, and conducting initial verification for each transaction. A PCI DSS compliance is necessary for companies opting for this type of gateway solution.
How to choose a payment gateway provider?
Choosing the right gateway provider for your business can sometimes be confusing and depends very much on your business specifics and your customer behavior. For example, one of the business specifics can be, does your company sells globally or nationally. Customer behavior can be what kind of card vendors are mostly used by your customers. These factors can play an important role in selecting the right payment gateway provider for your business.
To make it simple here is a list of things to consider before making a decision.
- Study the different types of gateway providers available in your country. If your business operates nationally you can look for domestic gateway providers. If you operate internationally then you need to choose between those that provide the option of receiving foreign currency.
- The next step is to study the pricing of each of these payment gateway providers. Every payment gateway providers have their own terms of use and fees. Fees can include setup fee, merchant account setup fee, monthly fee, and a fee for each transaction processed. Some providers may charge you all of the aforementioned fees while some may charge only on a per transaction basis. There might also be some hidden fees or the fees may be exclusive of taxes. Make sure to read the documentation carefully before making a decision.
- Make sure to check the minimum and maximum transaction amounts that can be processed by a gateway service provider. For example, the minimum transaction limit for a certain provider is $0.50, while you have products that sell for $0.10. Then this gateway provider may not be the right choice for you. Also, make sure to check the daily or monthly transaction limits. This may be rare but may still have a huge effect on your choice.
- Also, ensure the payment gateway provider supports all the payment methods that are used by your customers such as credit/debit cards, PayPal, Union Pay, Alipay, etc., and mobile payment methods such as Google Pay and Apple Pay.
Integrating a hosted payment gateway for your website
Now that you have made an informed decision to choose a payment gateway, it is time to understand the steps involved in integrating the payment gateway with your website. For explanation, we are going to use the Cashfree payment gateway as an example.
- Create an account with the payment gateway provider you have selected with your business email account. Once you created the account, verify the email by clicking on the link sent in your business email.

- After the verification most payment gateway providers will provide you access to a test account where you will be able to test the functioning of the payment gateway dashboard.
- To fully activate your account you will need to submit important documents to the payment gateway provider. These documents may include your business registration documents, bank details, tax documents, etc.
- If you are operating a WordPress website, then you can download your desired payment gateway from the plugins section on your admin panel. Next, you need to install and activate the desired plugin.

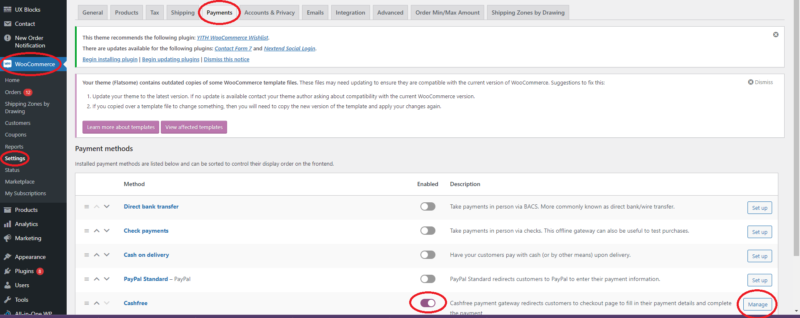
- Once installed the payment method will appear in the payments section of your WooCommerce settings. You need to enable the payment method and then click on ‘Manage’ to apply the appropriate settings for your payment gateway to work properly.
- The Payment gateway provider settings allow you to run the gateway in ‘Test’ mode or ‘Live’ mode. It is recommended to use the ‘Test’ mode to fully understand all the features provided by your provider.
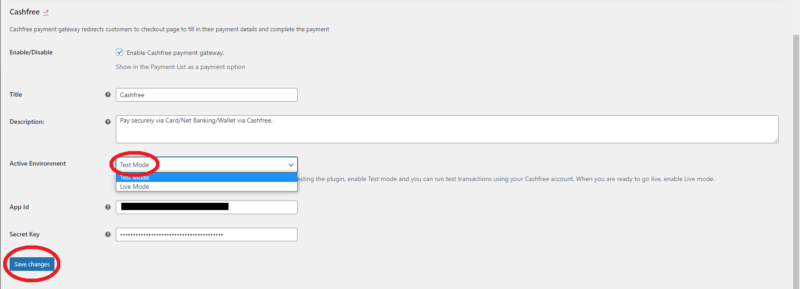
- You will then have to enter an API key and a secret key. The API key and secret key will be found in the credentials or developers section of your payment gateway dashboard. Make sure to enter the appropriate keys when using the gateway in either of the modes mentioned above.

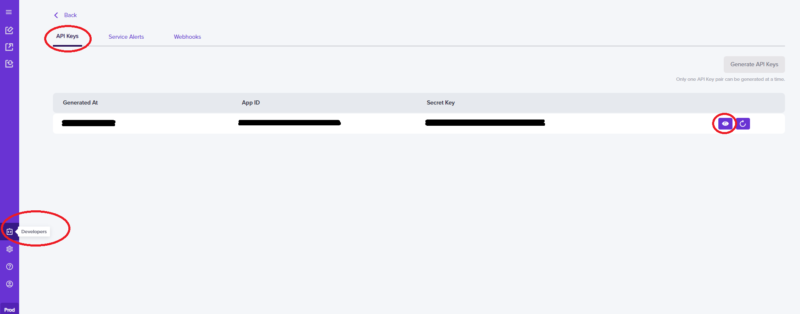
- Once the keys are entered, you can test your website’s new payment gateway and its various payment methods.
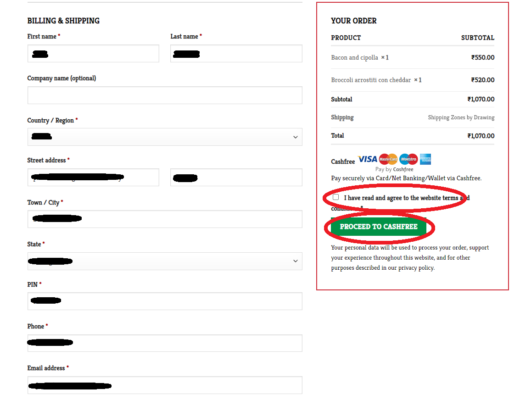
- Go to your website shop and purchase a product. On your checkout page, you will be able to see the new payment method. Once you enter your billing details and proceed to checkout, you will be redirected to the payment gateway provider’s secure URL.
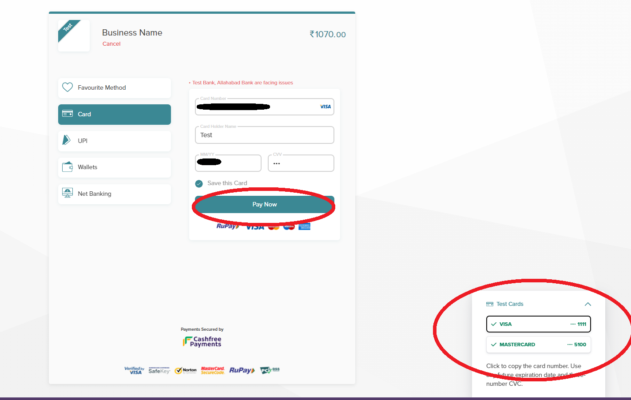
- Here you will be asked to choose from a variety of payment methods such as cards, UPI, wallets, etc. The ‘Test’ mode will have test cards and other details that you will need to complete the transaction.
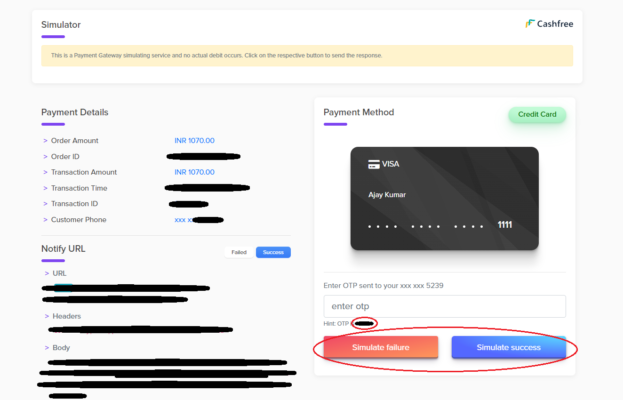
- Once these details are entered, you will be able to either simulate a successful transaction or a failed transaction.
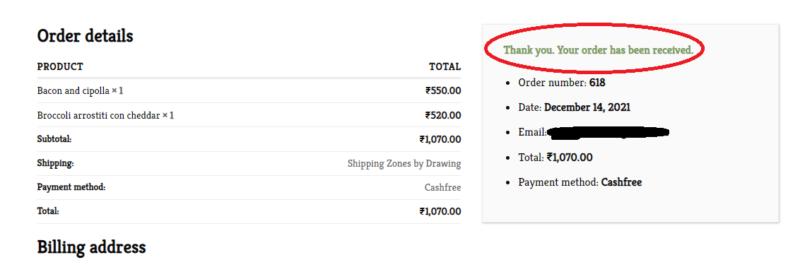
- On a successful transaction, you will be redirected to a new page that notifies you of a successful order.
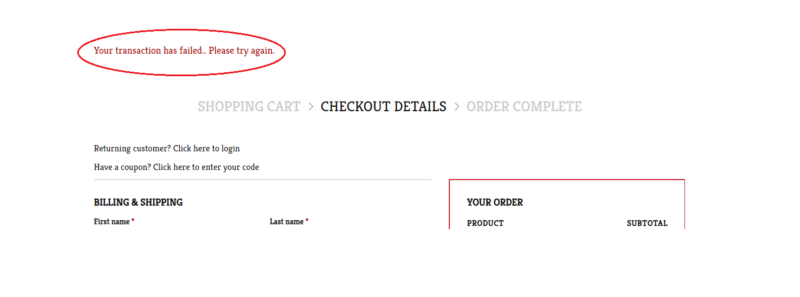
- On a failed transaction, you will be redirected to your checkout page notifying you of the failed transaction.
- You will also be able to see a successful order placed on your website in your payment gateway dashboard.
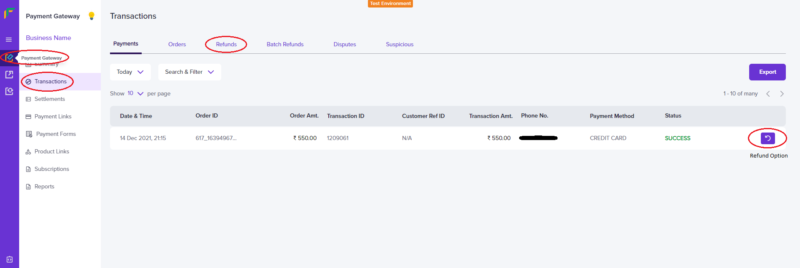
- From here you will be able to see details regarding the order and also test the refund feature if applicable for your website.
- Once you have understood all the features and functionalities of the payment gateway, both on your website and the payment gateway dashboard, you can run the payment gateway in ‘Live’ mode and start selling your products online.

