There are many scenarios where online store owners might need to temporarily disable WooCommerce functionality on their website. For example, around the holiday season, due to a staff shortage, or simply because the products they sell aren’t available or on backorder. Woo-commerce also does not allow for businesses that operate locally and can only serve the orders when their place of service is open. Example of such businesses can be restaurants, grocery stores, laundries etc. In such cases, it’s a good idea to have a simple way to temporarily deactivate WooCommerce and let customers know when it’ll open up again. Ideally, you’d want to be able to use a plugin to do this, instead of disabling your entire WooCommerce store or messing around with code if you are not sure of what you are dealing with. In case you need to do it in code, You will need to learn the different hooks used by WordPress for loading the woocommerce functionalities and add allocated custom actions to those hooks. Here is a reference to the hooks you may need to use: https://developer.wordpress.org/reference/hooks/
We have created this plugin to enable businesses such as restaurant owners to enable and disable the WooCommerce functionality manually as when they need it. This plugin also allows users to display custom messages on shop, product, cart, and checkout pages and at the same disable the add to cart, proceed to checkout and payment buttons on the respective pages.
Features:
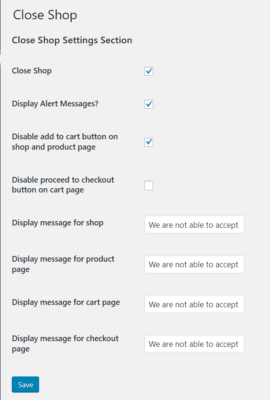
- Close Shop checkbox (to enable or disable the plugin)
- Display Alert Messages? checkbox (to enable or disable the alert messages on each page)
- Disable add to cart button on shop and product page checkbox (to enable or disable the add to cart feature on product or shop page)
- Disable proceed to checkout button on cart page checkbox (to enable or disable the proceed to checkout feature on the cart page)
- Set custom display message for shop page
- Set custom display message for product page
- Set custom display message for cart page
- Set custom display message for checkout page
How to Install the plugin?
The plugin is very easy to install. The plugin has been submitted into the WordPress repository and should be available for you to install directly from the Plugins-> Add new Section. Once installed you will simply need to activate the plugin after which A “Close Shop” menu should appear in your dashboard menu from where you can access and configure the settings. You can also directly install the plugin here.
Download pluginAfter you have finished the download, head over to your Dashboard -> Plugins -> Add new -> Upload Plugin
Once the plugin is activated successfully, you can access the settings from your dashboard.
Future ideas
We have a lot more features planned for the future for this plugin. These include scheduling store times, custom display pop-up designs, and more. So stay tuned. If you find the plugin useful, you can choose to donate to us using the link below.
Make a DonationDo let us know your feedback and suggestions in the comments section below!


